Roomba not charging – Roomba 960 diagram – Bin full light on after emptying bin… – More Bin Fixes
When I first saw a Roomba, I didn’t think it would be very good at cleaning. I also thought it was expensive. But after owning one for almost ten years, I’ve changed my mind. It’s a great little machine, and I’m impressed with its engineering. The Roomba does a great job of cleaning my floors, and it’s easy to use. I especially like the scheduling feature, which allows me to set the Roomba to clean on a regular basis.
In 2016, after my spouse had heart surgery, I bought a Roomba® 960. It was a great investment that freed us from vacuuming. We also have pets, and the Roomba does a great job of picking up their hair. The Roomba moves around our house easily, navigating furniture and vacuuming under sofas and beds in multiple rooms on a single charge.
The Roomba is compatible with smart devices such as phones, Alexa®, and Google Home®. This makes it incredibly easy to operate. The newer models are less expensive than previous models and offer even more functionality.
Roombas® are great practical gifts for working families and elderly relatives. There are many models to choose from, each with different features that make it suitable for a particular need. For example, some models have a camera that allows you to see the cleaning path, while others have a remote control so you can start and stop the cleaning cycle from anywhere in the house.
Care and Feeding of Your Roomba®

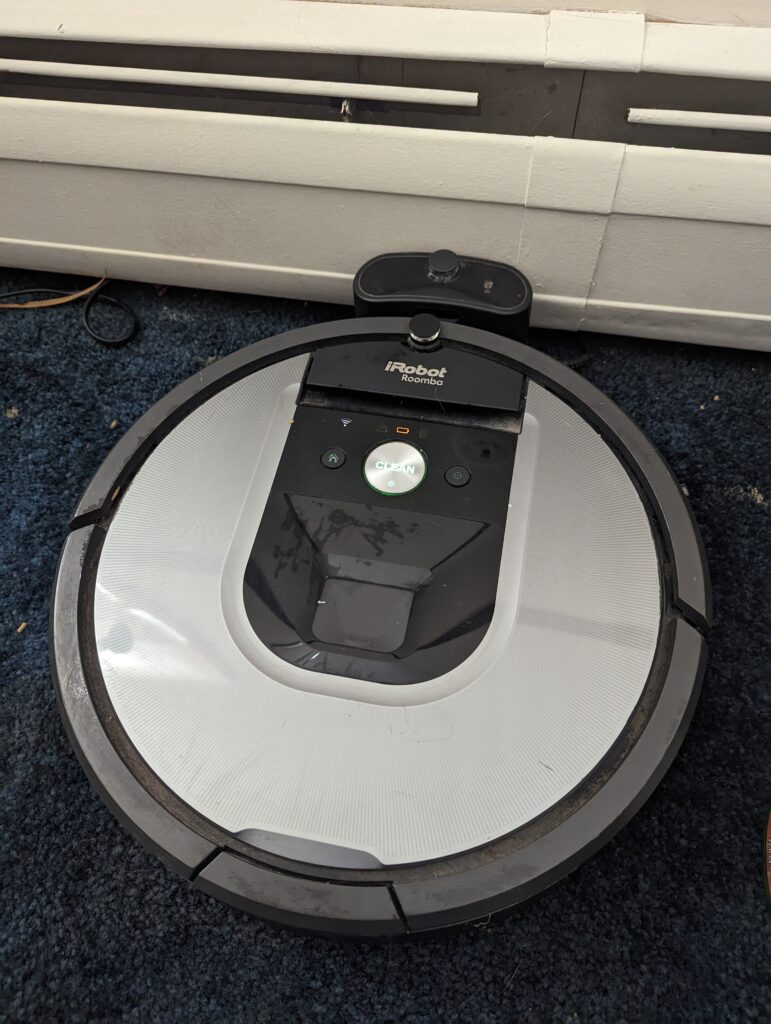
1. Room Confinement Sensor
2. Handle
3. User Interface
4. Localization Camera
5. Bin Release
I’ve owned a Roomba for several years now, and have learned a few things about it that I’d like to share. I’ve used these methods myself, and they worked for me. One thing I’ve learned is that the Roomba is easier to fix than you might think. If you have a Roomba that isn’t working properly, don’t despair. There are several things you can try to fix it yourself. First, make sure that the brushes and rollers are clean and in good working order. Also, make sure that the sensors are clean and free of dust and dirt. If the brushes and sensors are clean, but the Roomba still isn’t working properly, you may need to replace the battery.
My Roomba® Is Not Charging Correctly…

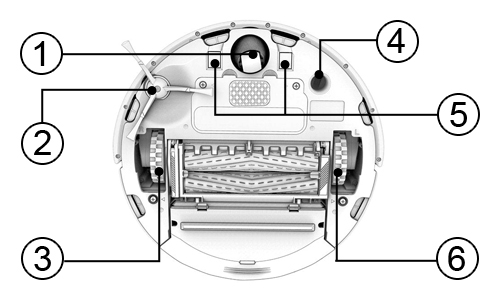
Roomba 960 series
1. Front Caster Wheel
2. Side Brush
3. Right Wheel
4.Floor Tracking Sensor
5. Charging Contacts
6.Left Wheel
Roomba® not Charging…
The most common problem with a Roomba is that it doesn’t charge. This is usually caused by dirty charging contacts on the base or the vacuum. To fix this, use a pencil eraser to rub or polish the contacts. Another method is to use a paper towel moistened with rubbing alcohol to clean the contacts. If these methods don’t work, you may need to replace the battery.

Roomba 960 series
1, Bin
2.Debris Extractors
3. Battery Door
4. Cliff sensors
Next steps
If the roomba® still isn’t charging or performing well after cleaning the charging contacts, it may be the battery needs to be replaced. My roomba was seven years old and I decided to replace it. Its very easy to replace the battery with just a screwdriver. On the 960, there are four screws in a rectangular pattern on the bottom of the unit. Removing these screws reveals the battery compartment. The battery isn’t connected to the roomba and is easily removed and replaced.
After seven years, I replaced my roomba battery with a TATTU 4500mAh XLife Extended Life Replacement Battery. It works quite well with almost 2 hours of cleaning time per charge. It didn’t catch on fire so far though my roomba is docked most of the time. All good. But there is an alternative to aftermarket batteries, but at twice the price.
Bin full light on after emptying bin…
If you’re using a Roomba, you know that it can be frustrating when the full bin light comes on, and the Roomba complains that the bin is full. This can be especially annoying if you’ve just emptied the bin. However, there may be an easy fix. First, remove the bin and check it for debris. I usually give the bin a light shake to dislodge any debris. Next, check the red plastic sensors inside the bin compartment and on the bin itself. Make sure they are clean and free of dust and debris. If they’re dirty, you can clean them with a soft cloth or brush. If that doesn’t work, you might need to use a vacuum cleaner or compressed air duster to clean the motor.
Maintenance and Care
Besides emptying the lint bin, there are a few other simple things I have done to keep my roomba® healthy.
- Check the extractors (multi-surface brushes: tubular rollers on the bottom of the unit). The roller ends can get clogged with hair and debris. Easily cleaned!
- The first step in maintaining your Roomba is to check the HEPA filter in the dust bin or filter unit. If the filter is in bad condition, it should be replaced. If the filter is dirty, it can be cleaned by tapping it on a hard surface outside your house and brushing it lightly with a small fine brush.
- Check the dirt disposal port after removing the dust bin.
- Check ball wheel at front, easily detached, check for lint build-up
If your Roomba needs repair, you can do it yourself with just a Phillips screwdriver. There are repair kits and replacement parts available for most models.
More Bin Fixes
There are a few errors concerning the bin and vacuum suction problems (error 8):
- When emptying the bin of your iRobot Roomba robot vacuum cleaner, gently tap it to dislodge any debris that may have gotten stuck inside the bin. It’s a good idea to always remove large items from the bin before emptying it so they don’t get stuck inside.
- You can clean the bin with compressed air. It is recommended to take the robot outside before using compressed air on its bin to prevent dust from scattering indoors.
- When cleaning the Roomba bin, you may use warm water to rinse out debris ( remove HEPA filter before washing), But before you insert it back into the vacuum, make sure that you allow it to thoroughly dry so that no excess water remains in the bin. Hand wash only, DO NOT USE DISHWASHER!
900 Series Service Diagram
This is a diagram of a 900 series roomba® layout generally similar to most iRobot vacuums.

- Bin
- Debris extractors
- Battery door
- Cliff sensors

